Mt. Eden Computer Applications I Class
 Word YOYO 7: a Newsletter...
Newsletter in WORD.
Click here for the file that you need: HILLSIDE.docx
In the HILLSIDE.docx file:
- Click before Band Tryouts on Tuesday.
- On the Layout tab use the Breaks button, selecting Continuous under Section Breaks or menu command Insert>Break>Section Break (Continuous).
- Use the Columns button on the Layout tab to set the document to two columns.
- Click before Bike Week Continues at the bottom of th left column and select Column break from the Break button on the Layout tab of the ribbon.
- Select the text The Hillside High Gazette. and in the Insert tab set it to Word Art
 : you may choose any style that you like.
- Set the title size to 36pts and center it.
- Adjust the box around it to fit across the page and with no extra space underneath it.
- Select the text The Hillside High Gazette. and in the Insert tab set Shadow>Outer>Offset: Bottom Right onto the The Hillside High Gazette title.
- Click on the heading Band Tryouts on Tuesday and in the Home tab on the ribbon set it to paragraph style Heading 1.
- Repeat for the two other headings.
- SAVE YOUR DOCUMENT: click
 -S.
-S.
- Select the last six lines of text in the document, beginning with the work Event.
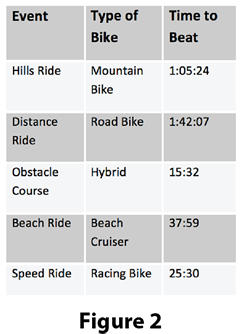
- On the Insert tab click on the Table button and select Convert Text to Table.
- In the Convert Text to Table dialog set Number of columns to 3, Number of rows to 6 and under AutoFit behavior select AutoFit to contents.
- With the table selected, go to the Table Design tab and set it to table style to Plain Table 4: counting left to right it is the 6th style.
- Fill the first, third and fifth rows with White, Background 1, Darker 15%.
- Select the whole table and set the boarders to 1 1/2pt white.
- Set the first row text to Font Size 14pts and the rest of the table, the table body, to Font Size 12pts.
- Your table should look like Figure 2 ==>
- SAVE YOUR DOCUMENT: click -S.
- Click before the text "The Tryouts." (The beginning of the third Paragraph)
- Insert this picture: Drummer.png.
- Select the picture by clicking on it, resize the graphic to be 1.75" in height.
- On the Format Picture tab on the ribbon set the Wrap Text to Square.
- Under the the Wrap Text button to select Edit Wrap Boundary.
- Click and drag the picture to the left side of the first column as in Figure 4.
- SAVE YOUR DOCUMENT: click -S.
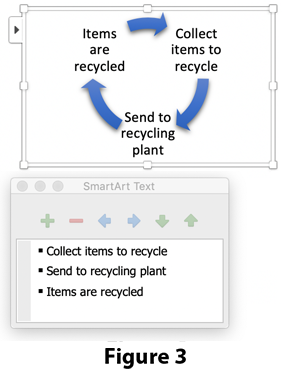
- Click the end of the first column, after the word "party."
- Insert a SmartArt Cycle: Text Cycle graphic.
- Delete two of the text boxes: three arrows will remain.
- Type in the text as shown in Figure 3 ==>
 On the SmartArt Design tab of the ribbon under the Change Colors button select Color Range - Accent Colors 5 to 6 or colors of your own choosing.
- Select Intense Effect style, or a style of your own choosing.
- On the Format Picture tab on the ribbon set the Wrap Text to Square.
- Resize and reposition the diagram so that it fits at the bottom of column one.
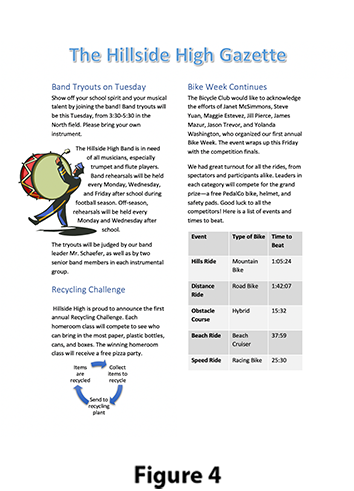
- Save your finished document. Your document should look like Figure 4.
- DONE.
As you work save your completed file in your folder in the Documents folder on your computer.
WHEN YOU ARE DONE...
TURN IT IN THROUGH GOOGLE CLASSROM.
This assignment is worth 25 participation points.